iOS Messaging Setup
iOS requires additional configuration steps to be completed before you can receive messages.
Integrating the Cloud Messaging module on iOS devices requires additional setup before your devices receive messages. There are also a number of prerequisites which are required to enable messaging:
- You must have an active Apple Developer Account.
- You may use a physical iOS device to receive messages or an iOS Simulator if you are on macOS 13+ on Apple Silicon using a Simulator running iOS 16+
- Firebase Cloud Messaging integrates with the Apple Push Notification service (APNs), however APNs only works with real devices or Apple Silicon macs running relatively new versions
Configuring your app
Before your application can start to receive messages, you must explicitly enable "Push Notifications" and "Background Modes" within Xcode.
Open your project's workspace file via Xcode (found within the /ios directory). The file name is prefixed with your project name,
for example /ios/myapp.xcworkspace. Once open, follow the steps below:
- Select your project.
- Select the project target.
- Select the "Signing & Capabilities" tab.
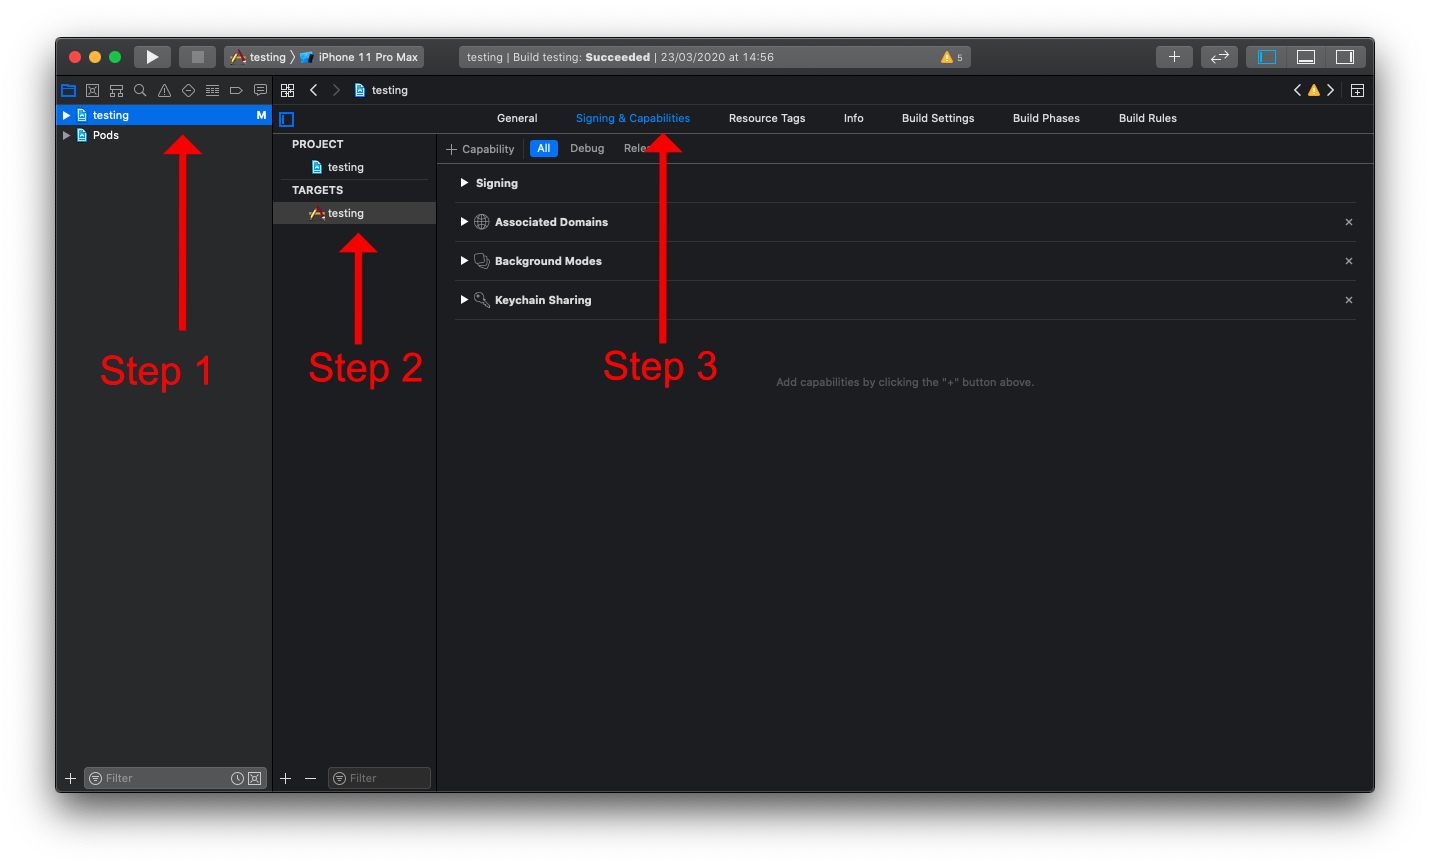
Enable Push Notifications
Next the "Push Notifications" capability needs to be added to the project. This can be done via the "Capability" option on the "Signing & Capabilities" tab:
- Click on the "+ Capabilities" button.
- Search for "Push Notifications".
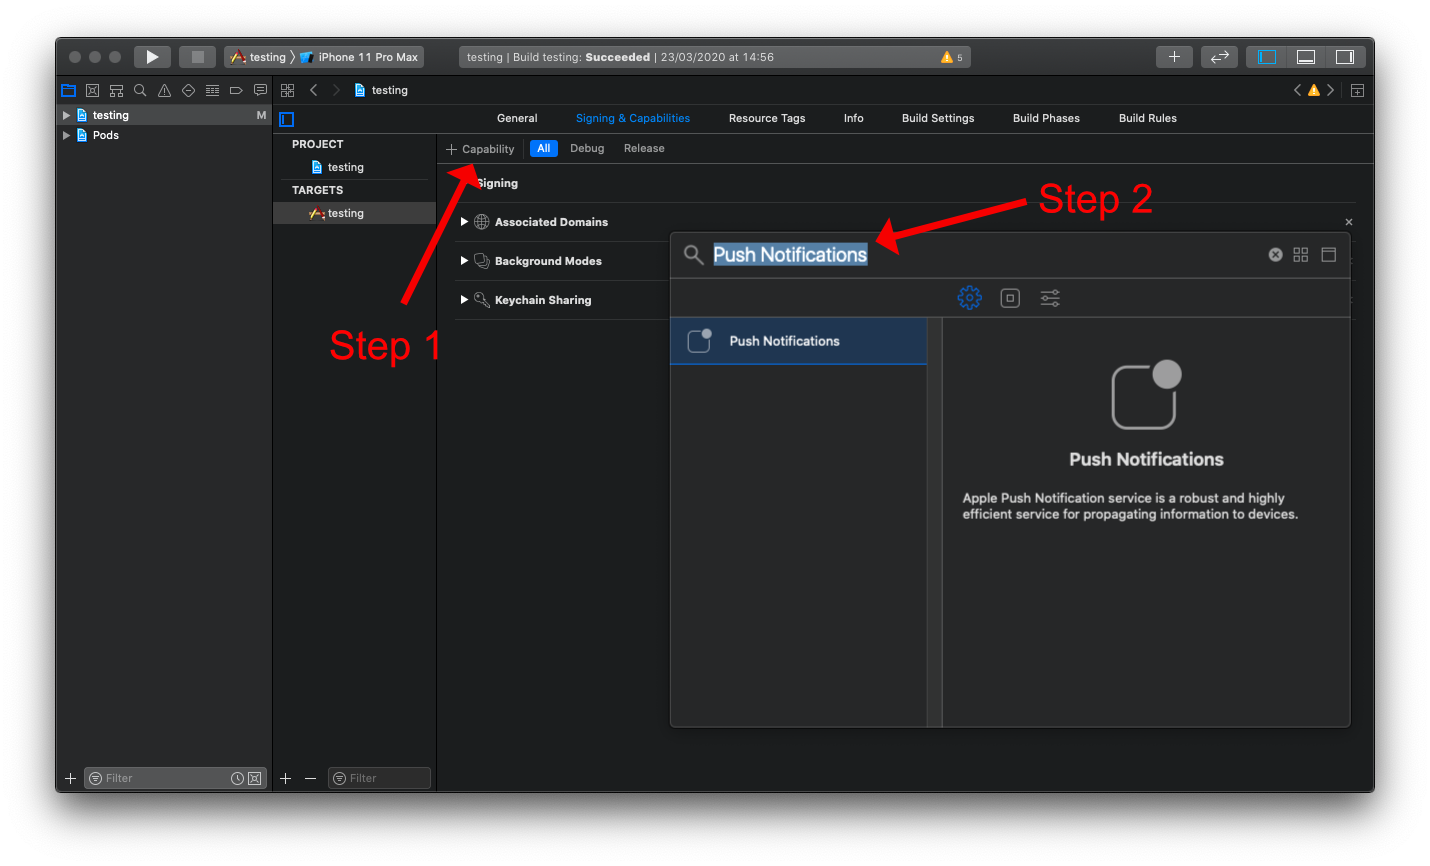
Once selected, the capability will be shown below the other enabled capabilities. If no option appears when searching, the capability may already be enabled.
Enable Background Modes
Next the "Background Modes" capability needs to be enabled, along with both the "Background fetch" and "Remote notifications" sub-modes. This can be added via the "Capability" option on the "Signing & Capabilities" tab:
- Click on the "+ Capabilities" button.
- Search for "Background Modes".
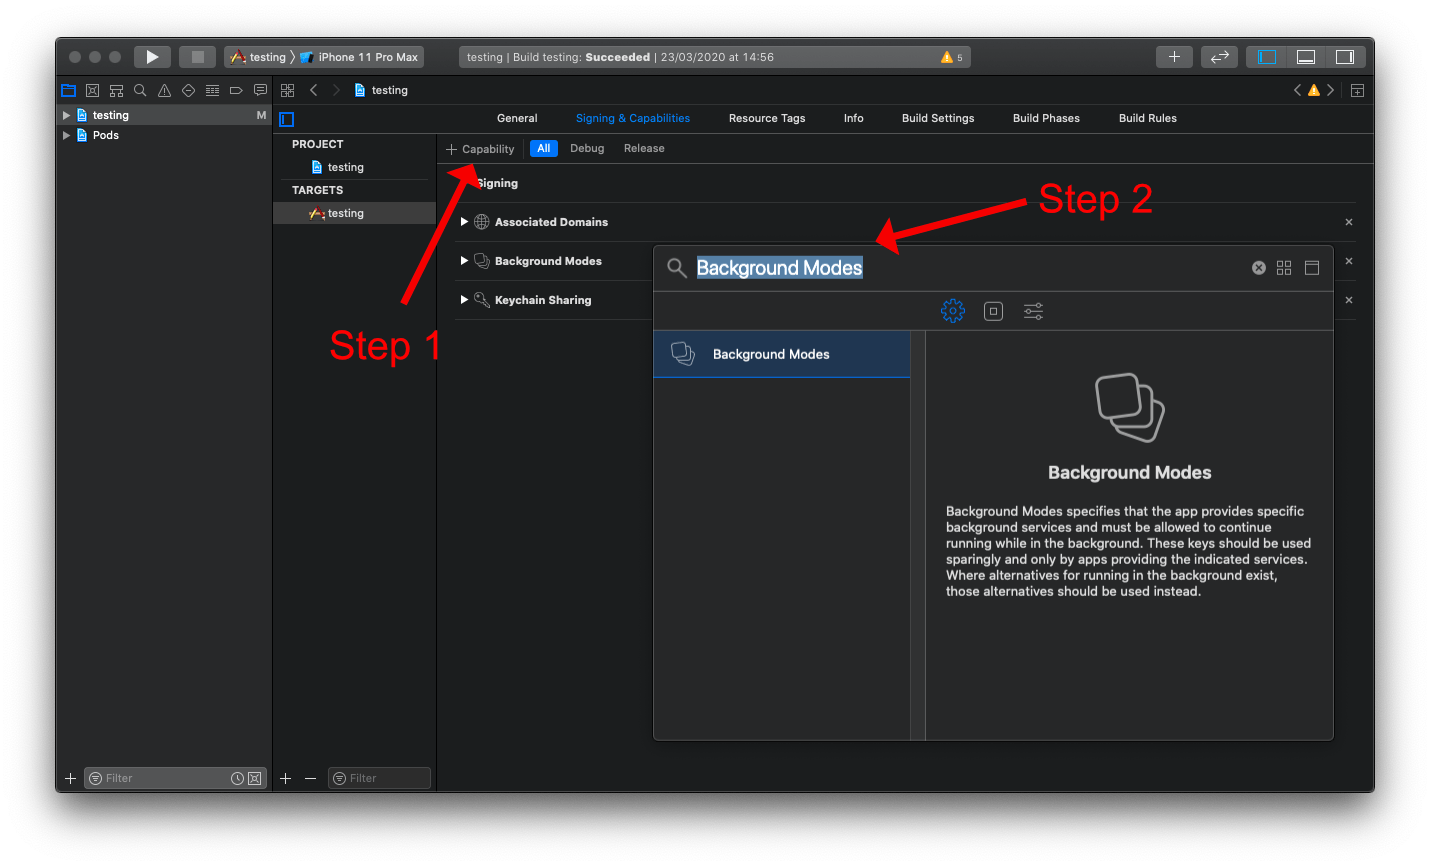
Once selected, the capability will be shown below the other enabled capabilities. If no option appears when searching, the capability may already be enabled.
Now ensure that both the "Background fetch" and the "Remote notifications" sub-modes are enabled:
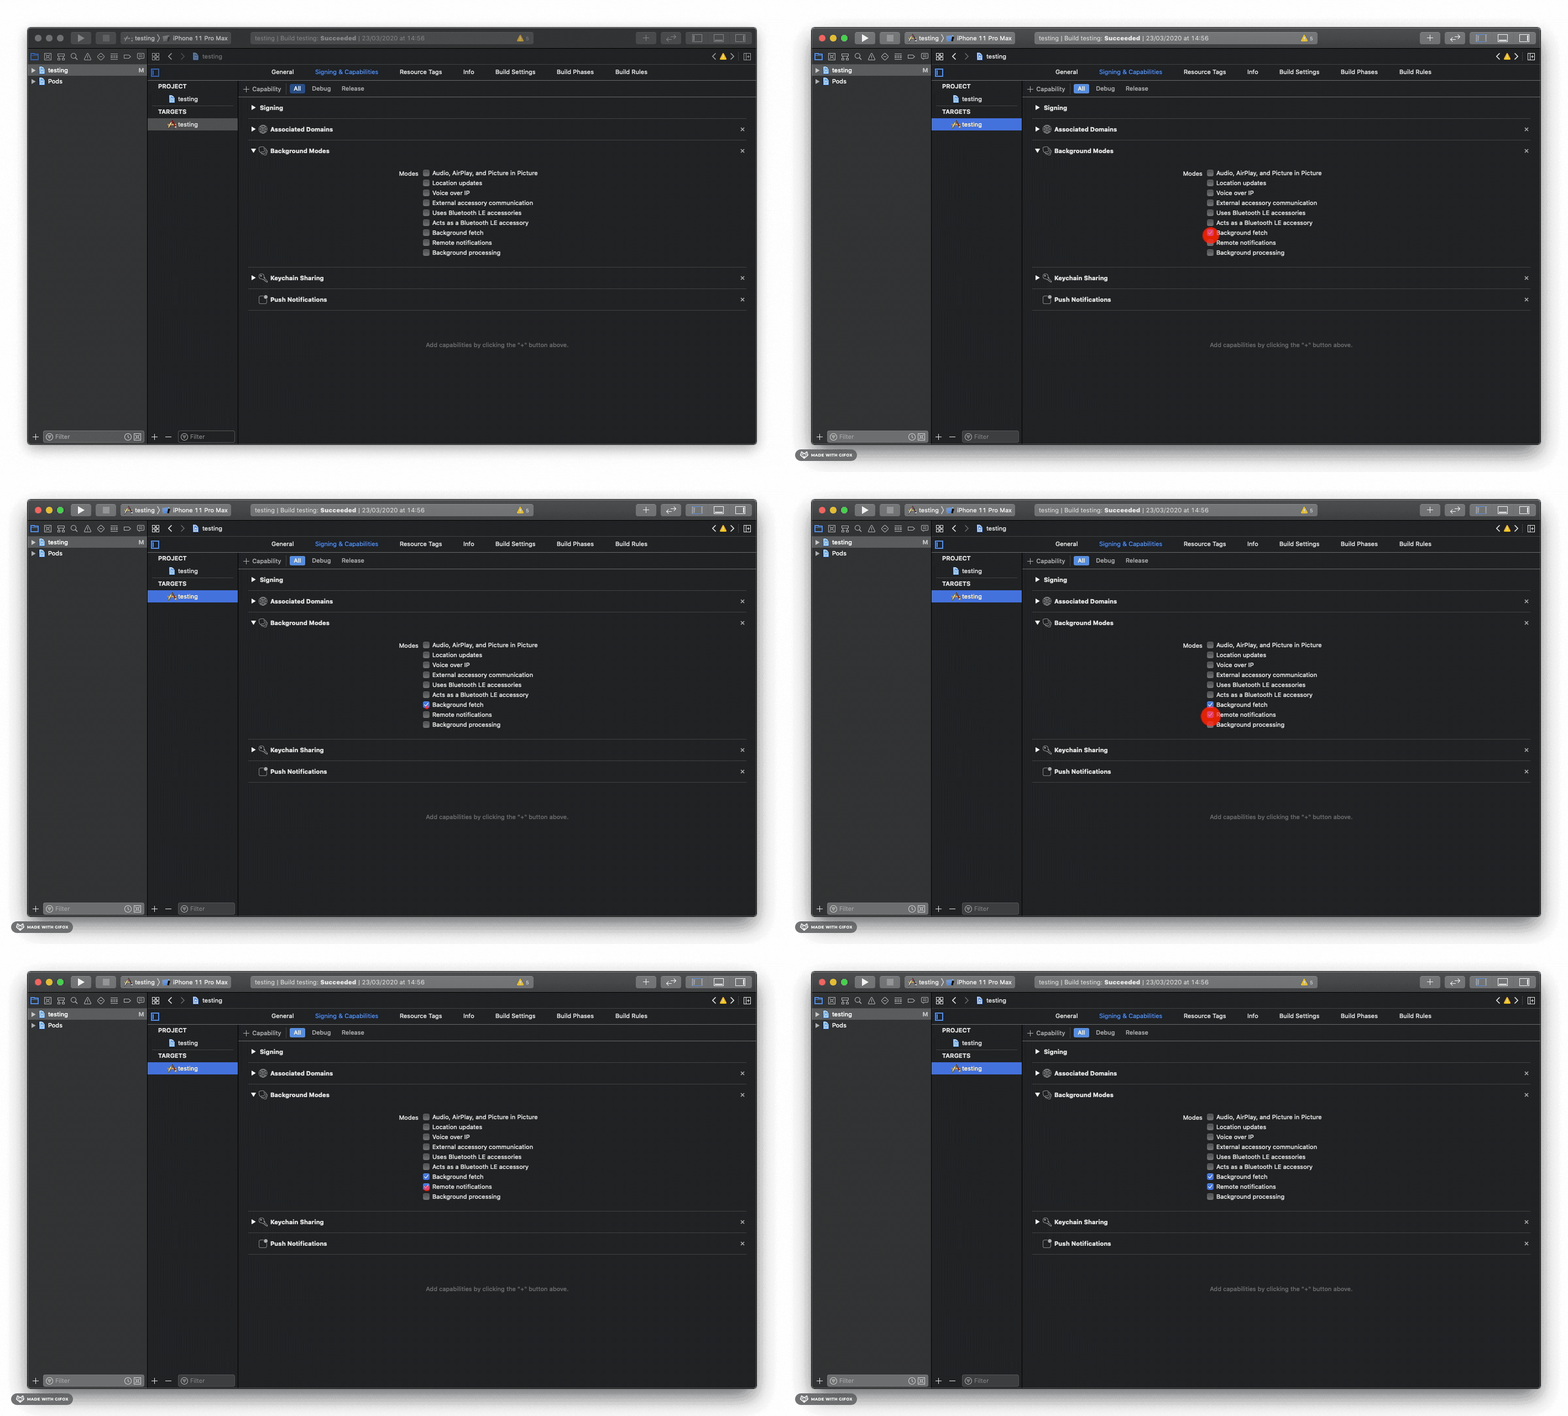
Linking APNs with FCM (iOS)
Note: APNs is now required for both
foregroundandbackgroundmessaging to function correctly on iOS.
A few steps are required:
All of these steps require you to have access to your Apple Developer account. Once on the account, navigate to the Certificates, Identifiers & Profiles tab on the account sidebar:

1. Registering a key
A key can be generated which gives the FCM full access over the Apple Push Notification service (APNs). On the "Keys" menu item, register a new key. The name of the key can be anything, however you must ensure the APNs service is enabled:
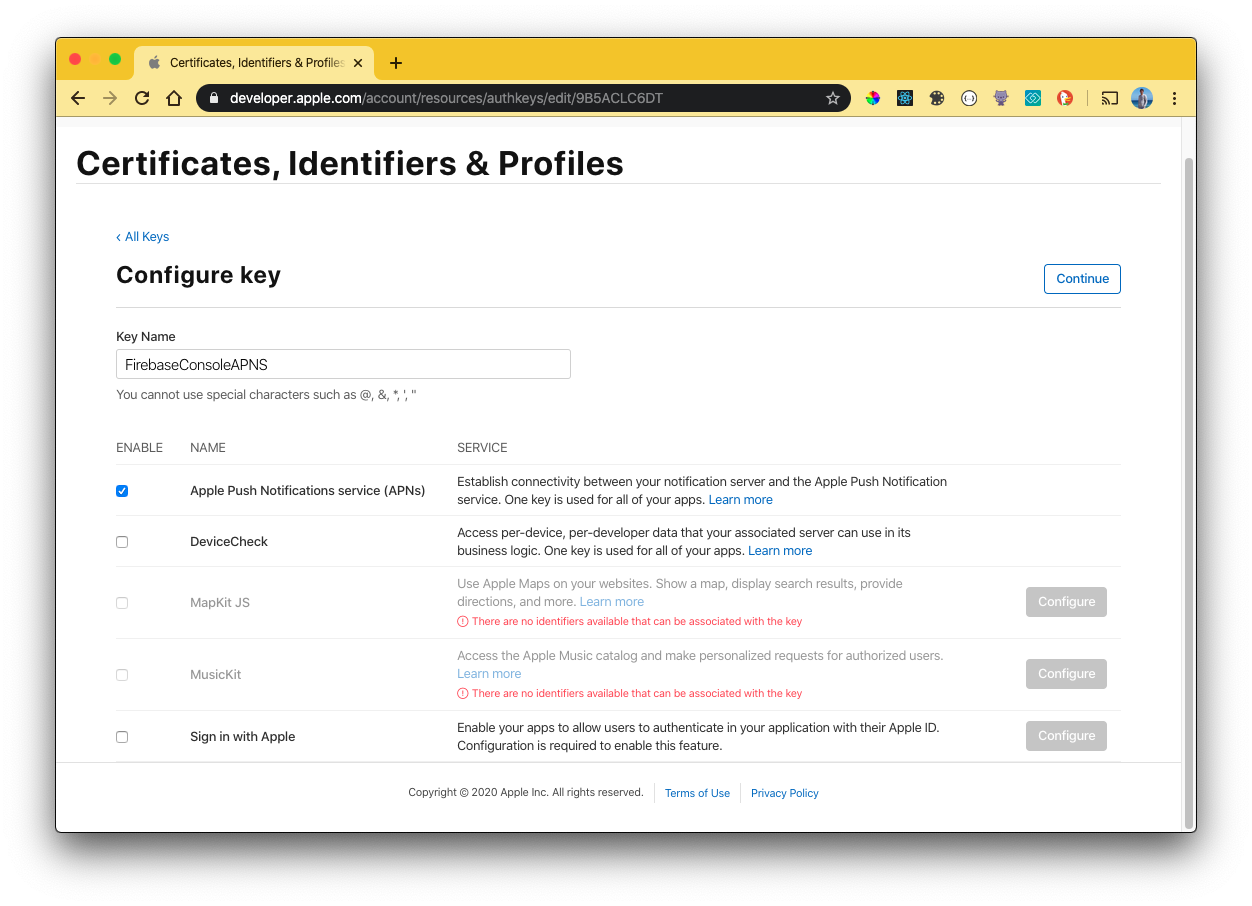
Click "Continue" & then "Save". Once saved, you will be presented with a screen displaying the private "Key ID" & the ability to download the key. Copy the ID, and download the file to your local machine:
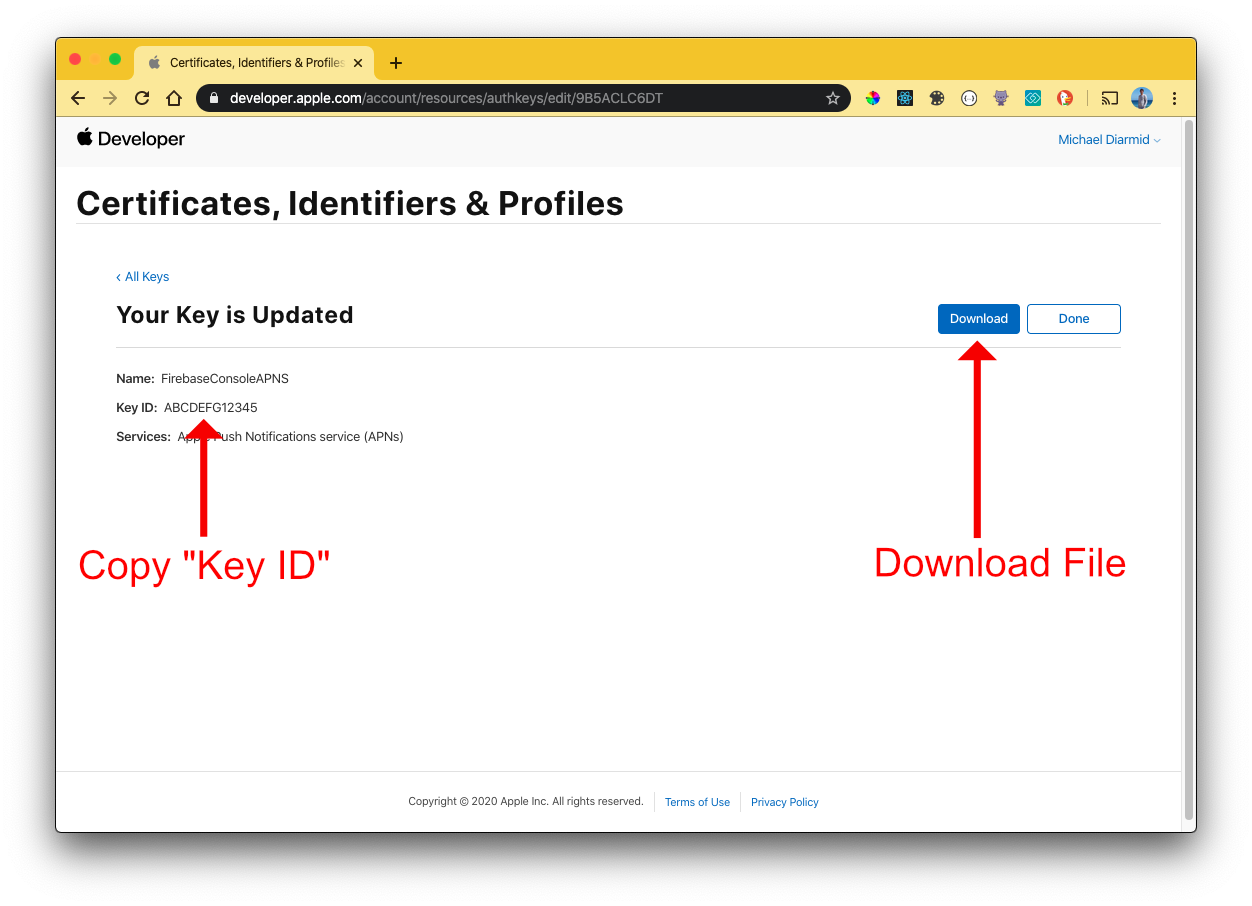
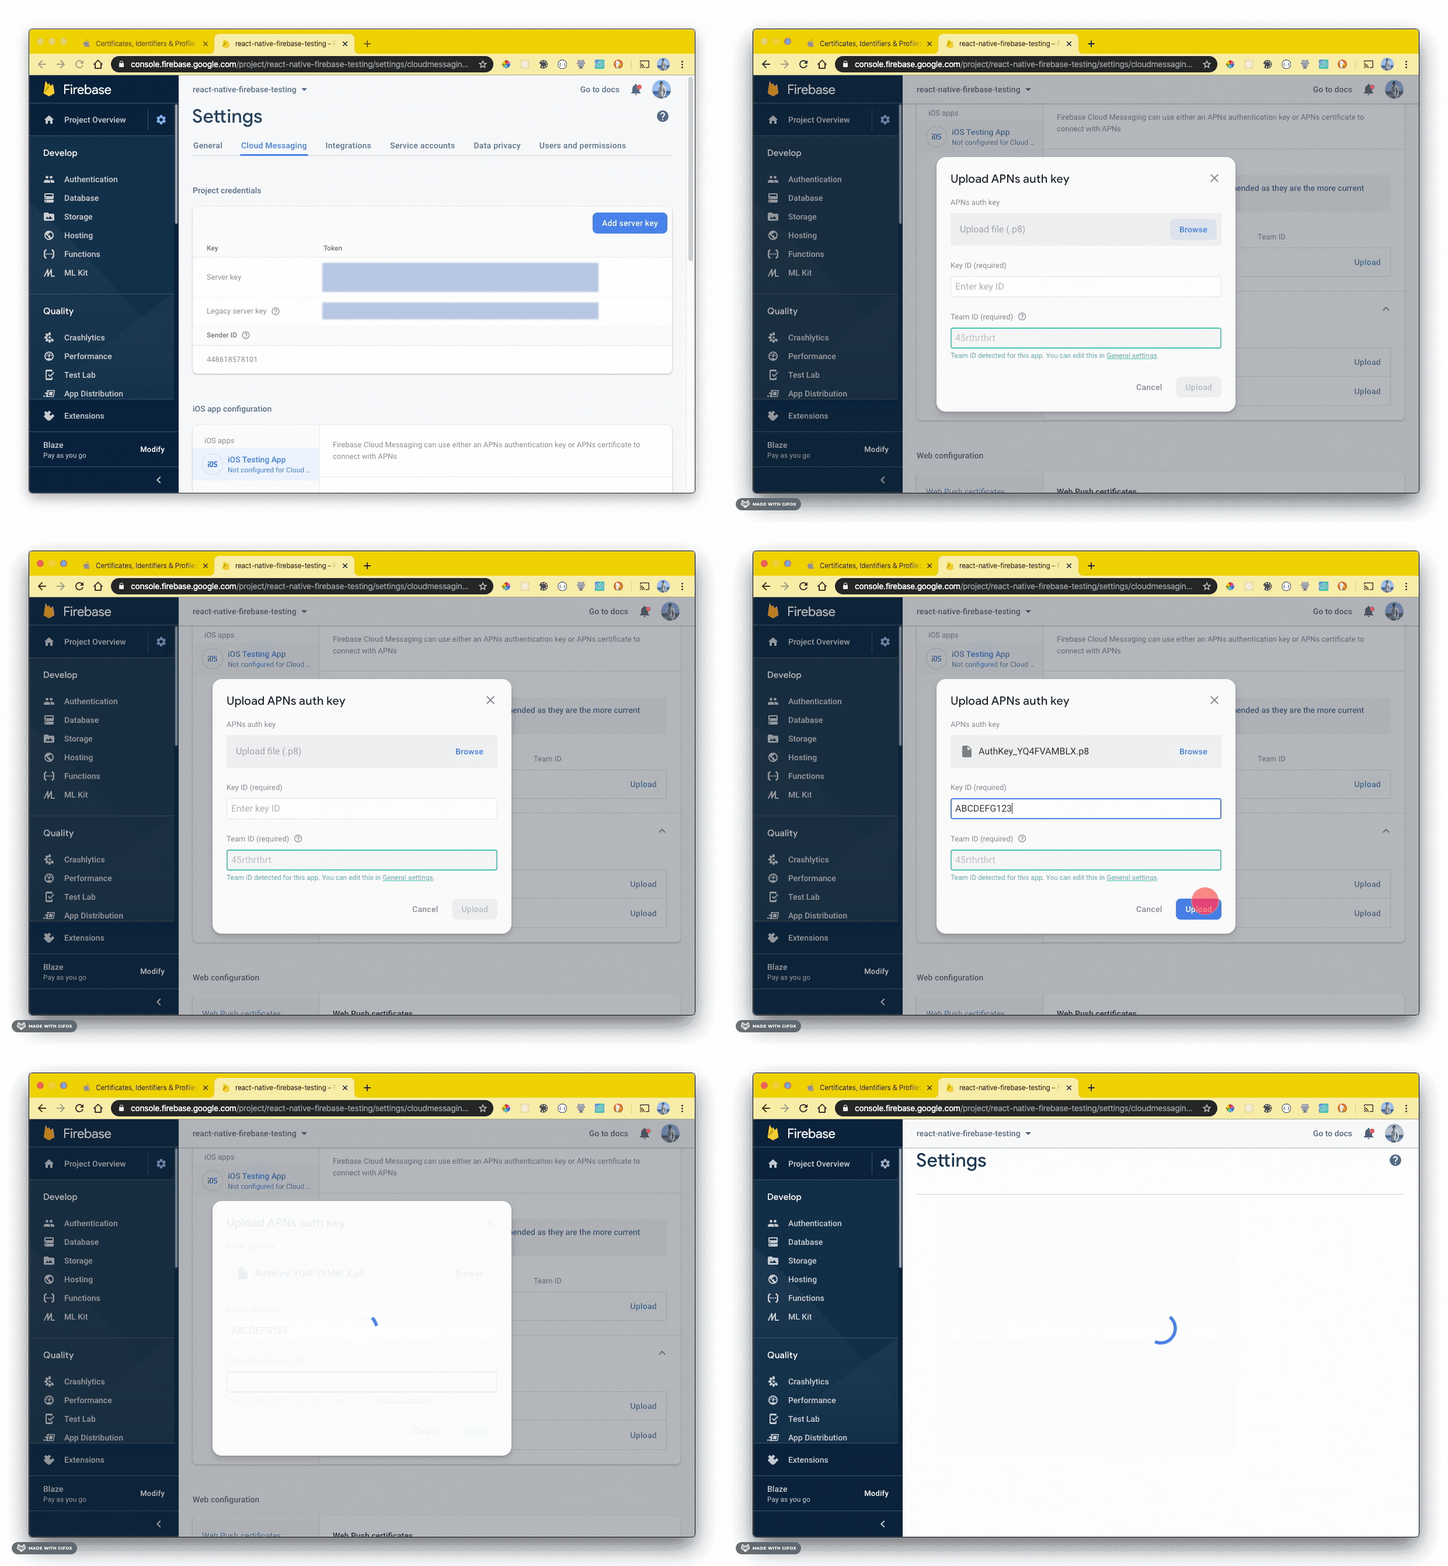
The file & Key ID can now be added to your Firebase Project. On the Firebase Console, navigate to the "Project settings" and select the "Cloud Messaging" tab. Select your iOS application under the "iOS app configuration" heading.
Upload the downloaded file and enter the Key ID:
2. Registering an App Identifier
For messaging to work when your app is built for production, you must create a new App Identifier which is linked to the application that you're developing.
On the "Identifiers" menu item, register a App Identifier. Select the "App IDs" option and click "Continue".
The following screen enables you to link the identifier to your application via the "Bundle ID". This is a unique string which was generated when starting your new React Native project. Your Bundle ID can be obtained within Xcode, under the "General" tab for your project target:
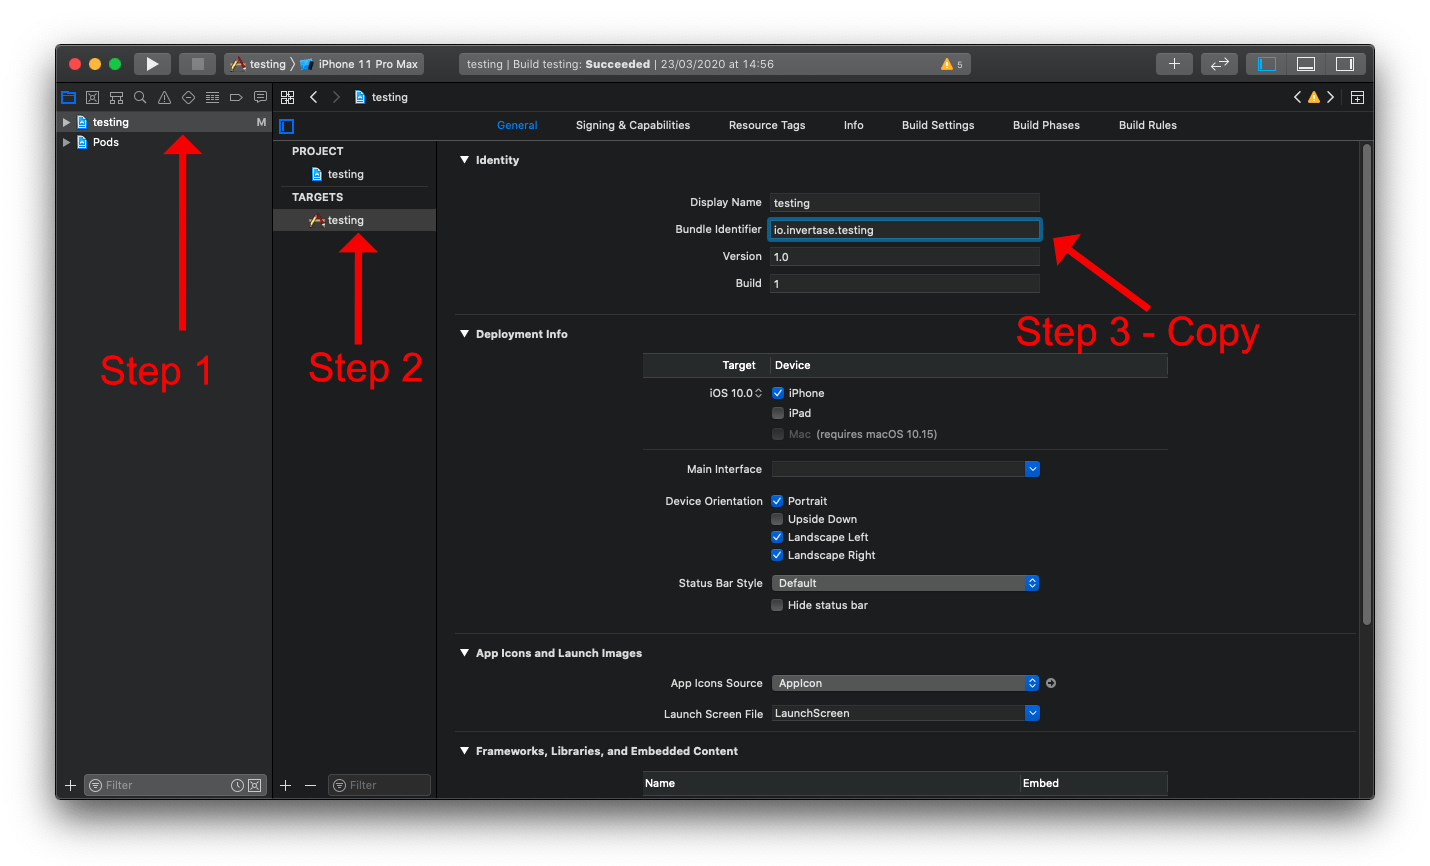
Next, follow these steps:
- Enter a description for the identifier.
- Enter the "Bundle ID" copied from Xcode.
- Scroll down and enable the "Push Notifications" capability (along with any others your app uses).
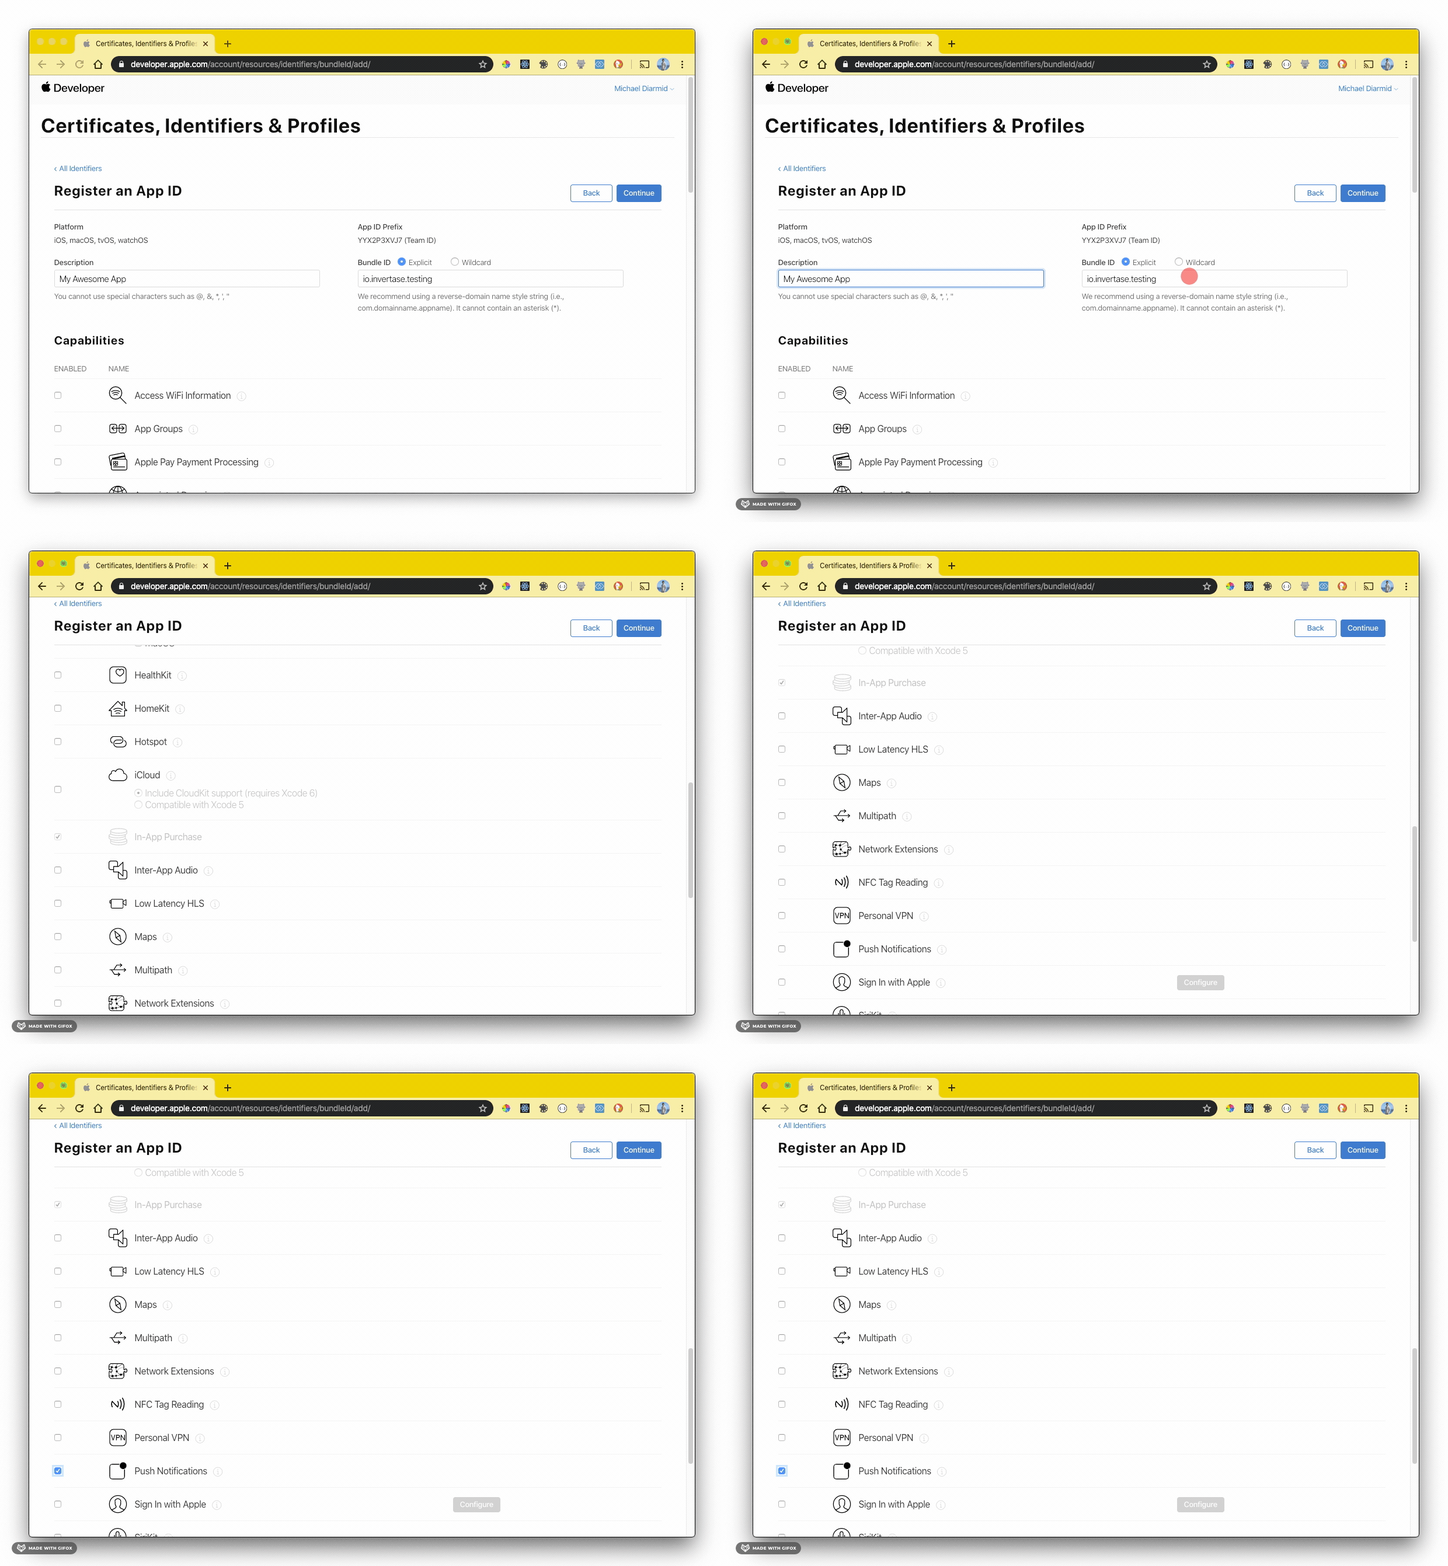
Save the identifier, it'll be used when creating a provisioning profile in the next step.
3. Generating a provisioning profile
A provisioning profile enables signed communicate between Apple and your application. Since messaging can only be used on real devices, a signed certificate ensures that the app being installed on a device is genuine and has the correct permissions enabled.
On the "Profiles" menu item, register a new Profile. Select the "iOS App Development" checkbox and click "Continue".
If you followed Step 2 correctly, your App Identifier will be available in the drop down provided:
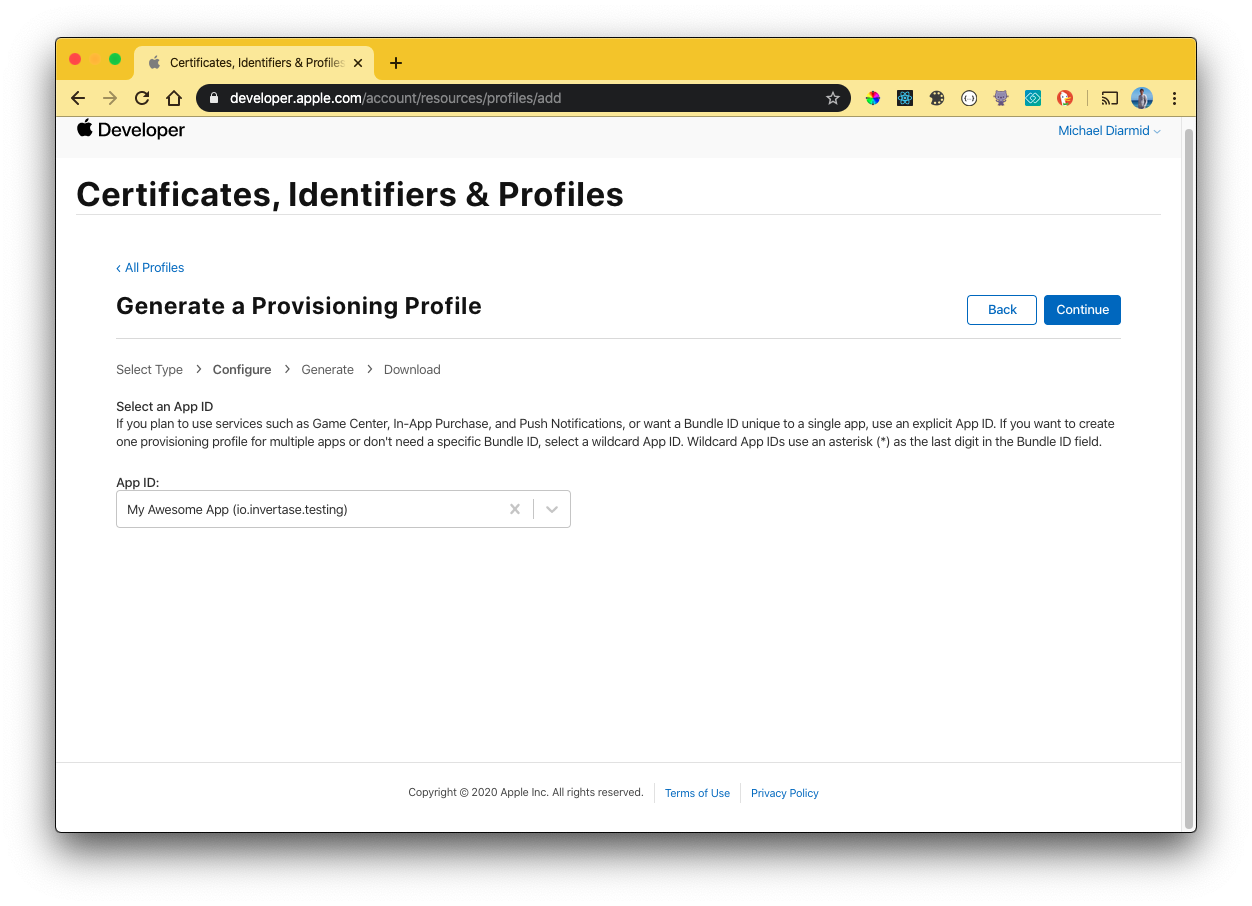
Click "Continue". On the next screen you will be presented with the Certificates on your Apple account. Select the user certificates that you wish to assign this provisioning profile too. If you have not yet created a Certificate, you must set one up on your account.
To create a new Certificate, follow the Apple documentation. Once the Certificate has been downloaded, upload it to the Apple Developer console via the "Certificates" menu item.
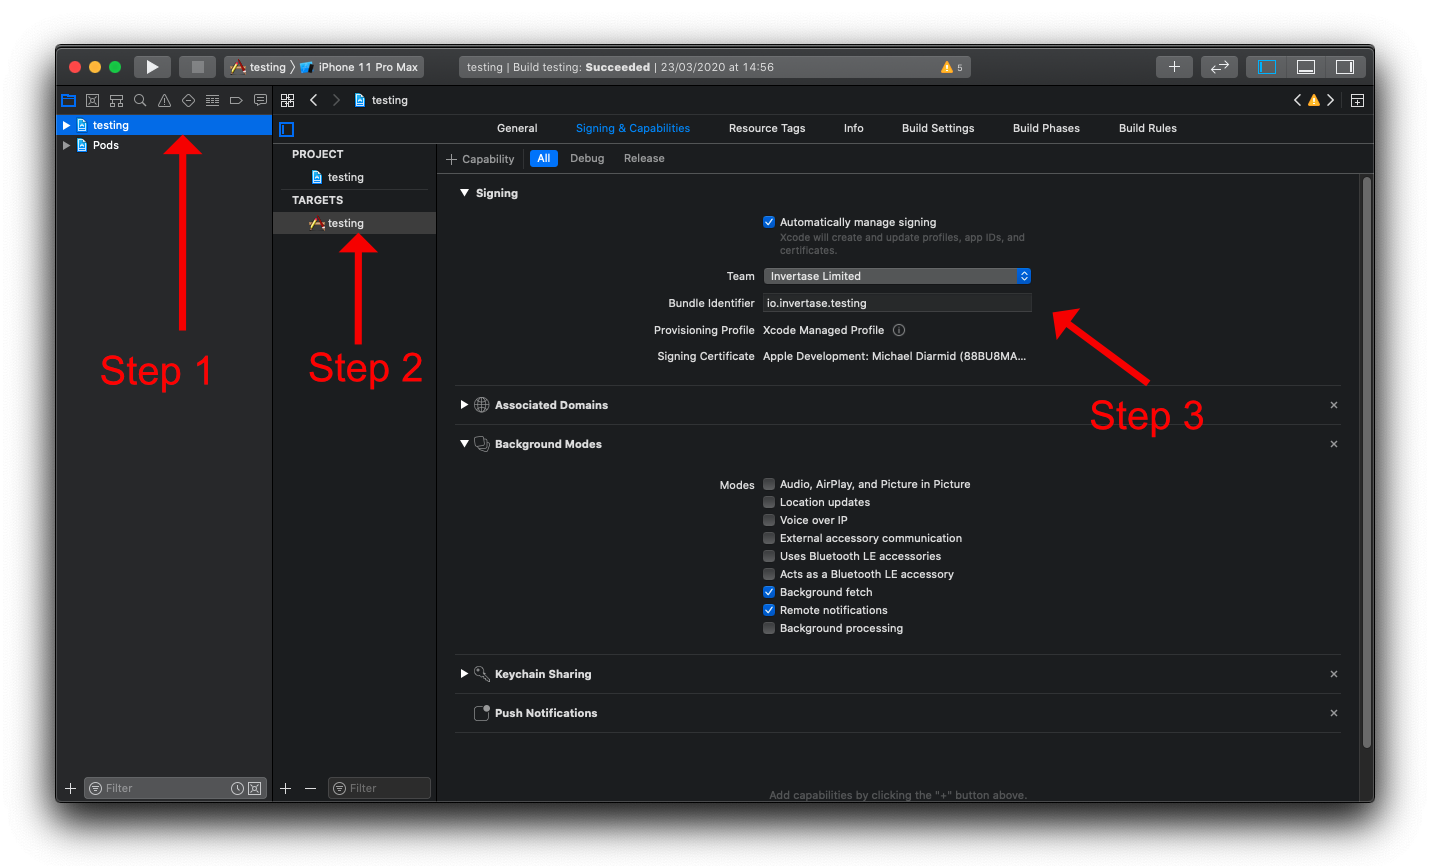
The created provisioning profile can now be used when building your application (in both debug and release mode) onto a real device (using Xcode). Back within Xcode, select your project target and select the "Signing & Capabilities" tab. If Xcode (via Preferences) is linked to your Apple Account, Xcode can automatically sync the profile created above. Otherwise, you must manually add the profile from the Apple Developer console:
- Select the project.
- Select the project target.
- Assign the provisioning profile.
Next steps
Once the above has been completed, you're ready to get started receiving messages on your iOS device for both testing and production. To rebuild your app, run the following command:
npx react-native run-ios
Note
Check the aps-environment Key
- Open the .entitlements file in Xcode or a text editor.
- Look for the aps-environment key. It should appear like this:
<key>aps-environment</key>
<string>development</string>
- Make sure it should be set to
productionfor the release build. If it's missing or set todevelopment, push notifications will not work in production.
